 |
Mapas de Fondo para GPS Lowrance iFinder Background Maps for Lowrance iFinder Receivers |
|
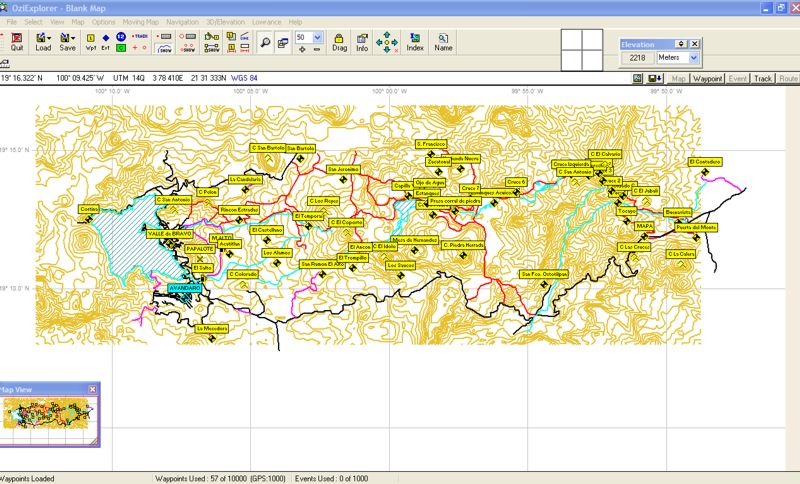
Español Hasta ahora no se sabe de algún programa que permita crear mapas detallados para receptores Lowrance y en particular de los iFinder. Sin embargo, los receptores de esta marca poseen cualidades no encontradas en otras marcas que podemos usar para crear "Mapas de Fondo". Entre ellas está la capacidad de almacenar hasta 100 tracks con 10,000 (diez mil) puntos cada una, la posibilidad de determinar si son visibles y activas, en modelos recientes, es posible configurar la apariencia del track en tonos del negro al blanco así como su aspecto. Estas características tan singulares permiten que de manera limitada, se puedan crear "mapas" de fondo de pequeña cobertura pero que te pueden ser útiles en tus excursiones. Para realizarlos, usamos Oziexplorer para "dibujar" el mapa con las características deseadas y después de subirlo al GPS, editamos su apariencia para que el "mapa" se viera de una forma lo más parecido a un mapa real. Aunque Oziexplorer puede dibujar tracks como áreas, el iFinder no los reconoce así y los toma como tracks cerrados. Esto quiere decir que no es posible representar características como áreas. Ejemplo: lagos, presas, parques, etc.
Nota: Hicimos el mapa y lo cargamos y probamos en nuestro Lowrance iFinder H2O así que sabemos que el método funciona. Las capturas de pantalla que verán a continuación se tomaron del emulador de Lowrance iFinder H20 para dar mayor realce a este artículo ya que no es posible hacer capturas directas del GPS. Estos emuladores reproducen el comportamiento exacto del GPS en tu PC y los puedes bajar www.lowrance.com .
|
English As far as we know there is no software available that allows the creation of custom maps for Lowrance receivers specially for iFinders. Nevertheless these receivers have certain features that lend themselves to create "Background Maps" . Among them we have up to 100 tracks of 10,000 points each, the posibility to select if they are active and if they shall be viewd in the GPS map screen and in recent models the ability to edit color and pattern. All these features allow for the creation of limited low coverage background maps that may be usefull in your explorations. To put them together we used Oziexplorer to "draw" the features we wanted and after uploading them to the GPS we edited them to achieve the viewing style we wanted to make it as close to a real detailed map as possible. Although Oziexplorer allows drawing area style tracklogs, the iFinder does not recognize them as so, and they are interpreted as a closed loop. This means there is no way to accurately represent area features such as lakes, dams or parks. Note: We made the map an loaded it in our iFinder H2O so we are certain this method works. The screen captures shown in this page were acquired using the H2O emmulator software as there is no way to make screen captures directly from the receiver. These emmulators reproduce the exact behaviour of the GPS using your PC and may be downloaded from www.lowrance.com . |
| Empieza por "dibujar" las características que deseas en tu mapa, usando las herramientas de tracks y waypoints de Oziexplorer. Usa un track distinto para cada tipo de característica. Te debe quedar algo como lo que se muestra en la siguiente imagen. Removimos el mapa real y asignamos diferentes colores para dar claridad. Las curvas de nivel se importaron de archivos GIS en formato SHP | Start by "drawing" the features you want in your map using Oziexplorer's track and waypoint tools. Use a different track for each feature type you want in your map. You should end up with something as shown in the image below. The map used to draw the features was removed and different colors were assigned to the tracklogs for enhanced viewing. Contours were imported to Ozi from GIS files in SHP format. | ||
|
|
|||
|
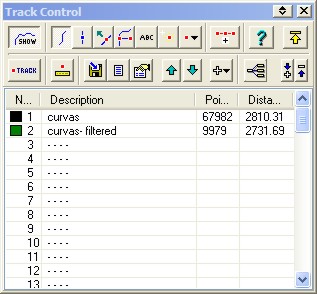
Dado que el límite de puntos por track es de 10,000 tenemos que hacer un filtrado de aquellos tracks que tengan más de esos puntos o el mapa quedará truncado. Para eso usamos la herramienta de filtrado de tracks de Oziexplorer. Carga el track a filtrar, abre el cuadro de díalogo de Tracks y selecciona la herramienta de filtrar. Nota que en nuestro caso, el track contiene más de sesenta mil puntos. |
 |
Remember the iFinder has a limit of 10,000 points per track. Any track with higher value must be filtered or the map will be trunkated. We used Ozi's track filtering tool. Load the track to be filtered, open the track control dialog and select the Filter tool. In our example we are filtering the contours tracklog which has over 60,000 points. |
|
|
Establecemos los parámetros de filtración a máximo de 10,000 puntos y procedemos. El proceso de filtrado hará que se reduzca la nitidez del track original. Si deseas mantenerla, deberás subdividir tu archivo en secciones menores. |
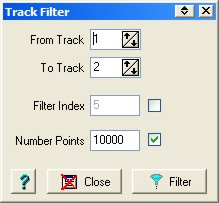 |
Set the filtering parameters to a maximum of 10,000 points. The filtering process will reduce the accuracy of the original lines in the tracklog. If you need to preserve the accuracy you shall split your original tracklog into smaller ones. |
|
|
Despupes del filtrado se generará un nuevo track. Este nuevo track es el que usaremos para el mapa. Nota que ya tiene un valor de menos de 10,000 puntos. |
 |
After filtering you will get a new tracklog with the correct amount of points. Use this new one to create your map. |
|
|
Ahora toda la información está lista para continuar elaborando tu mapa.
Nota que hay un track por cada característica del terreno. Usa waypoints para identificar lugares importantes como poblaciones, montañas, valles, etc. |
 |
Now all the information is ready to continue building the map. Notice that there is one tracklog for each feature we want in our map. Use waypoints to identify key places such as towns, mountains, valleys and so forth. |
|
|
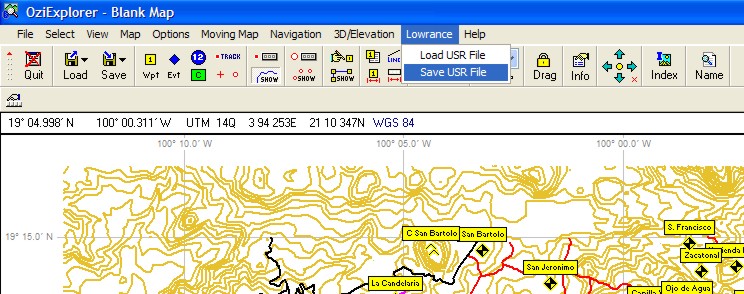
Configura Oziexplorer para Lowrance y guarda tu archivo en formato USR. Recuerda que los archivos USR tienen tanto waypoints como tracks además de que se guardan directamente en la tarjeta SD o MMC del GPS.
|
Set up Oziexplorer for Lowrance and save the USR file. Please remember that USR files store both waypoints and tracklogs together. Save the file to the MMC or SD card. |
||
|
|
|||
|
Carga la tarjeta en el GPS y copia los archivos a su memoria. Ahora abre el menú de "My Trails" que es el administrador de tracks en el GPS. |
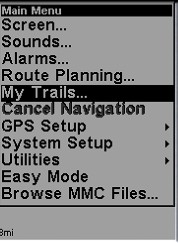 |
Load the card in your receiver and save your USR file to the main memory. Now open the "My Trails" menu which is the tracklog manager in the receiver. |
|
|
Aparecerá la lista con todos los tracks que tienes disponibles. Ahora empezaremos a editarlos uno a uno para darles una mejor apariencia. Selecciona en track que editarás. Nosotros empezamos con el llamado "Brechas". |
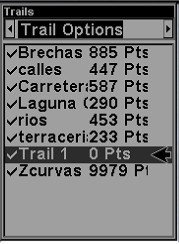 |
A list of all your tracklogs will show. Now we shall edit each to get better display attributes. Choose your track and start editing. We chose the one named "Brechas" |
|
|
Asegúrate de que no esté marcada la casilla "Active" y que si lo esté la casilla "Visible".
Después selecciona "Trail Style" |
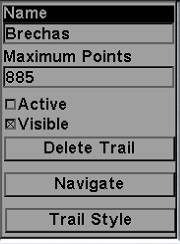 |
Make sure that the "Active" checkbox is empty and that the "Visible" one is checked as seen in this image. Then select "Trail Style" |
|
|
Selecciona el color deseado de las cuatro opciones disponibles. Edita el patrón de apariencia del track. Ve tu manual para las instrucciones detalladas de como hacer esto. |
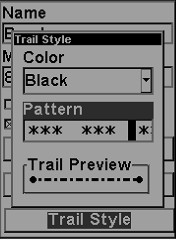 |
Choose the color among the available options. Edit the tracklog pattern to the one that suits you. See your GPS owner's manual for the detailed steps to accomplish this step. |
|
|
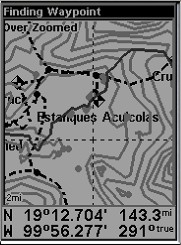
Repite el proceso con cada uno de los tracks. Cuando finalices, ve a la pantalla de mapa y acerca el zoom lo necesario para que puedas visualizar tu "mapa". La parte izquierda superior de esta imagen es la presa de Valle de Bravo que quedó en blanco al no poder representar áreas en el iFinder. Las líneas negras son calles y las gris obscuro son curvas de nivel. |
 |
Repeat the process for each of your tracklogs. When you are done, page to the Map Screen and zoom in as needed to display your "map". In this sample the top left section shows a lake (Valle de Bravo) in white as areas could not be represented in the iFinder. Black lines are streets and dark gray ones are contours. |
|
|
Otro aspecto del mapa en una región distinta. Las líneas negras discontinuas representan brechas y veredas. |
 |
Another section of the map showing a trail (dashed line) |
|
|
Puedes apreciar los waypoints que marcan puntos importantes. En Oziexplorer puedes editar los símbolos para que den una apariencia más detallada de las caracteríticas importantes para tí |
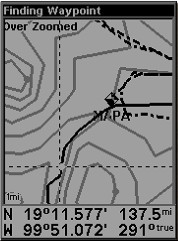 |
You can see the waypoints showing important features. In Ozi you may edit the symbols to improve your map's appearance. |
|
|
Ahí tienes un "mapa de fondo" que aunque no muy completo y detallado, suficientemente bueno para ayudarte en tus exploraciones.
|
There you have it. A simple "Background" map that although not fully detailed and complete is good enough for your explorations. |
||