 |
Subiendo Mapas a GPS Magellan Uploading Maps to Magellan Receivers |
|
Serie Meridian Si tienes un equipo de la serie Meridian, es necesario disponer de una tarjeta SD en la cual solo tienes que copiar el archivo IMG con un lector de tarjetas externo. Introduce la tarjeta en el GPS y sigue las instrucciones del menu “Card Utilities” para activar y usar tu mapa. Esta es la forma más sencilla y rápida. También lo puedes hacer usando el método que se explica a continuación, pero no es lo más práctico.
Sportraks y Map330 Cada vez que Magellan emite una nueva actualización del firmware de un GPS, se usa un programa llamado Magup para cargarlo en el receptor. Este software tiene otras opciones algo desconocidas para la mayoría de los usuarios, entre ellas cargar mapas de detalle. Ese es el método que a continuación describimos. Para obtenerlo ve al sitio de Magellan (www.magellangps.com) en la sección de "Support" y "Software updates". Descarga el que corresponde a tu equipo. ADVERTENCIA Aunque el método aquí descrito ha sido probado detallada y exitosamente en modelos Meridian Platinum, Sportrak Map y Sportrak Color, ni BiciMapas ni cualquiera de sus colaboradores, nos hacemos responsables de daños que pueda sufrir tu GPS al cargarle mapas de detalle. Cargar estos mapas puede anular tu garantía. Lo haces bajo tu propio riesgo y responsabilidad. SIGUE LAS INSTRUCCIONES EXACTAMENTE COMO SE INDICA. DE NO HACERLO ASÍ, TU GPS PUEDE SUFRIR DAÑOS QUE SOLO EL FABRICANTE PODRÍA REPARAR A TU COSTO.
1. Descarga el software Magup y extráelo a una carpeta en tu PC
2.Apaga el GPS y conéctalo a la PC con el cable serial. Asegúrate de saber el número del puerto de comunicación que estás usando.
3. Con el GPS apagado, oprime simultáneamente los botones de "GoTo" y "NAV". Sin soltarlos, oprime "PWR" y en un par de segundos aparecerá una ventana en el centro de la pantalla del GPS con dos ceros (00). En el momento en que aparezcan, puedes dejar de oprimir los tres botones.
4. Usando el botón central del cursor con las flechas verticales, modifica los números centrales hasta que quede en "98" y oprime "Enter"
5. Ahora selecciona "Upload detail Map", presiona "Enter" y déjalo así.
6. En la PC, dale doble click a MagUp para ejecutarlo
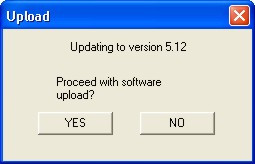
7. El Programa abrirá y te preguntará si deseas actualizar el "firmware" de tu equipo a lo que debes contestar que no. |
Meridian Series You must have an SD card to load custom maps. Using a card reader all you have to do is copy the IMG file in the card. Then insert the card in the GPSr, go to "Card Utilities" and select the custom map. This is the easiest and faster way but you may also use the method described below.
Sportraks and Map330
Each time Magellan
issues a new firmware update, a program called Magup is used to upload the
firmware to the GPS. This same software has other options which are unknown
to most user's, among them uploading detail maps. This is the method we will
use.
To get Magup go to the
Magellan site (www.magellangps.com) go to "Support" and "Software updates".
Download the correct one for your unit.
WARNING
Although this methos has
been tested in the Meridian Platinum, Sportrak Map and Color, neither
BiciMapas nor any of its contributors, accept any responsibility for any
damage that your GPS receiver may have when uploading detail maps. Uploading
these custom maps may void your warranty.
You do it at your own risk.
FOLLOW THE
INSTRUCTIONS EXACTLY AS INDICATED. IF YOU DO NOT, YOUR GPS MAY GET DAMAGED
IN A WAY THAT ONLY THE MANUFACTURER MAY REPAIR AT YOUR COST.
1. Download Magup and
extract it to a folder in your PC
2. Turn off your GPS and
connect it to the PC with the serial cable. Make sure you know the COM port
number.
3. With the GPS turned
off, simultaneously press "GoTo", "NAV" and "PWR" until two zeros (00) show
in the middle of the GPS screen. At this time you can release the 3 buttons
4. With the rocker
button modify the numbers until you have "98" and press "Enter"
5. Now select "Upload
detail Map", press "Enter" and leave it like that.
6. On the PC, double
click Magup to launch it.
7.The program wil start
running and will ask if you want to proceed with "Firmware" upload. Select
"NO" |
|
|
|
|
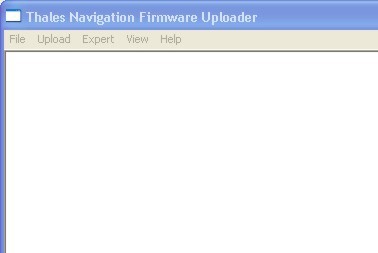
8: En la parte superior selecciona el el menú "Expert"
|
8. On the menu bar, select "Expert" |
|
|
|
|
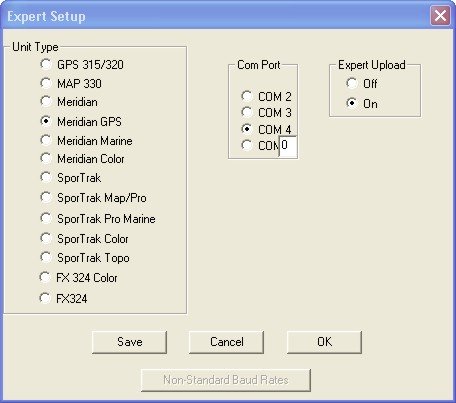
9. Aparece la siguiente pantalla en la que debes:
|
9. The following screen shows and you must:
|
|
|
|
|
10. Ahora selecciona el menu "Upload"
|
10. Now select the "Upload" menu |
|
|
|
|
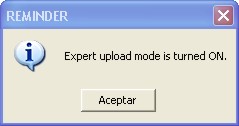
11. Aparecerá un recordatorio de que el modo "Expert" está activo. Oprime aceptar.
|
11. A reminder of the "Expert" mode being active shows. Accept it. |
|
|
|
|
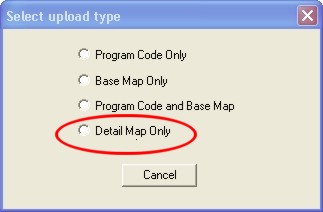
12. En la siguiente pantalla selecciona "Detail Map Only"
|
12. On the next screen select "Detail Map Only" |
|
|
|
|
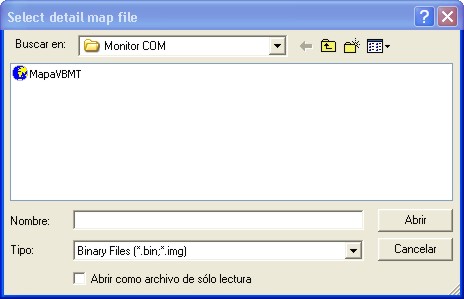
13. Se abrirá una ventana para que selecciones el archivo que deseas cargar al GPS. Navega hasta la carpeta donde lo tienes guardado
|
13. On the next window, browse to the folder where you stored the map to be uploaded. |
|
|
|
|
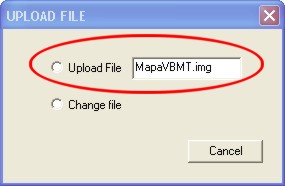
14. Selecciona "Upload File" como se indica en la figura.
|
14. Select "Upload File" as shown in the next picture |
|
|
|
|
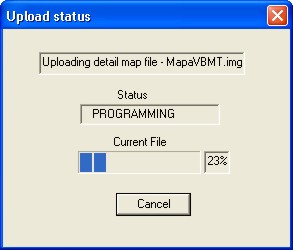
15. Se abre la ventana que indica el progreso de carga. Al terminar el GPS se apagará por si solo. Enciéndelo nuevamente y podrás ver el mapa de detalle que acabas de cargar. En este momento ya puedes cerrar el software Magup. Recuerda que los modelos Sportrack y Map330 solo pueden tener un mapa de fondo.
|
15. A window with the upload progress shows. When the upload is finished. the GPS will turn off by itself. Turn it on again and you will be able to see your detail map. At this time you may turn off Magup. Remember that Sportraks and Map330 may only have one detail map at a time. |
|
|
|
| Regreso | Back |